Installation & Assembly of “GE” Flange Adapter
 |
 |
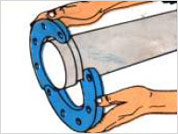
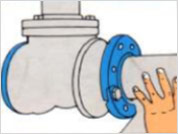
| 1. APPLY ‘GE’-FLANGE : Open ‘GE’. Flange fully and place hinged flange around the 431,01:Ned pipe and with the circular key section locating into the groove. The ‘Uncle cavity to receive the gasket must lace the pipe end_ Do not remove the permanent hinge for any reason |
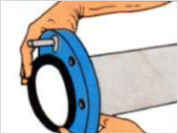
2. INSERT FLANGE BOLT : Insert a standard flange bolt through the mating holes of the NMC-Flange to secure the flange firmly in the groove |
 |
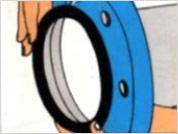 |
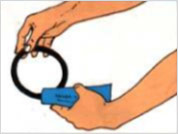
| 3. CHECK GASKET AND LUBRICATE Chad( gasket supplied to be certain it is suited for intended service. color code identifies gasket grade Apply a than coat of ‘NMC‘ Lubricant or silicone lubricant to gasket lips and outside of gasket. | 4. INSTALL GASKET: Press the gasket into the cavity between the pipe O.D. and flange recess. Be certain the gasket is properly positioned as shown. Alter gasket is in place, apply additional lubricant liberally to the outer gasket lip which will seal on the mating flange face |
 |
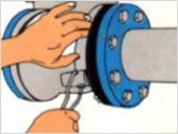 |
| 5. MATE NMC-FLANGE AND FACING FLANGE: Race a second standard flange boll in the hinge hole (opposite the first) and direct the two boll assembly to mate with the adjoining flange. NOTE NMC-Flange is designed to provide proper seeing with the special NMC-Flange gasket supplied. No standard flange gasket is required. |
6. ADD BOLTS AND TIGHTEN : Add the remaining standard flange bolts and tighten all the nuts evenly as with a regular flange assembly, until laces contact firmly or boils attain recommended flange joint torque figures. |